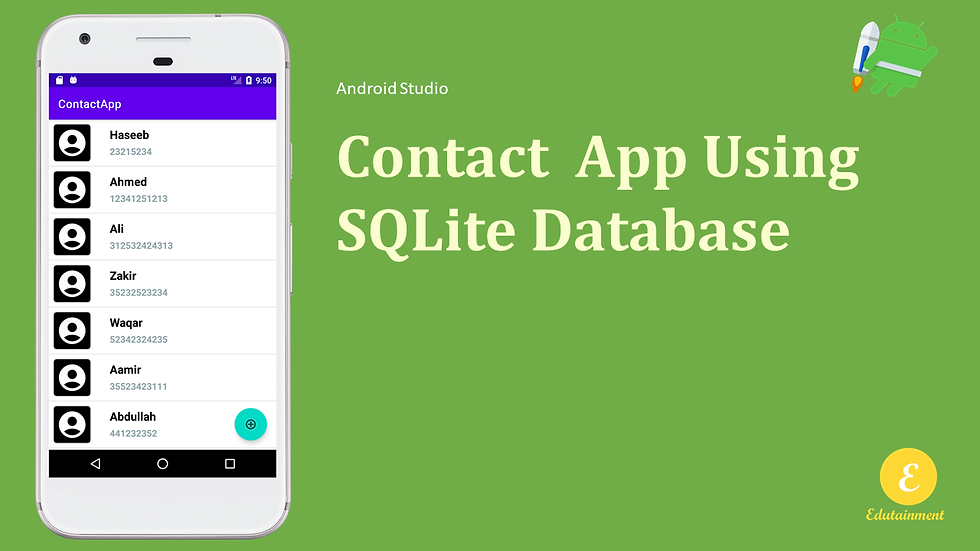
Contact App Using SQLite Database in Android Studio
- Haseeb Hussain

- Apr 16, 2023
- 8 min read
In this tutorial we will learn how to create a simple contact app in android studio while saving the app data to SQLite database.
The primary reason of this tutorial is to make you understand how we can connect SQLite to the android app and us it to make our applications.
Lets begin
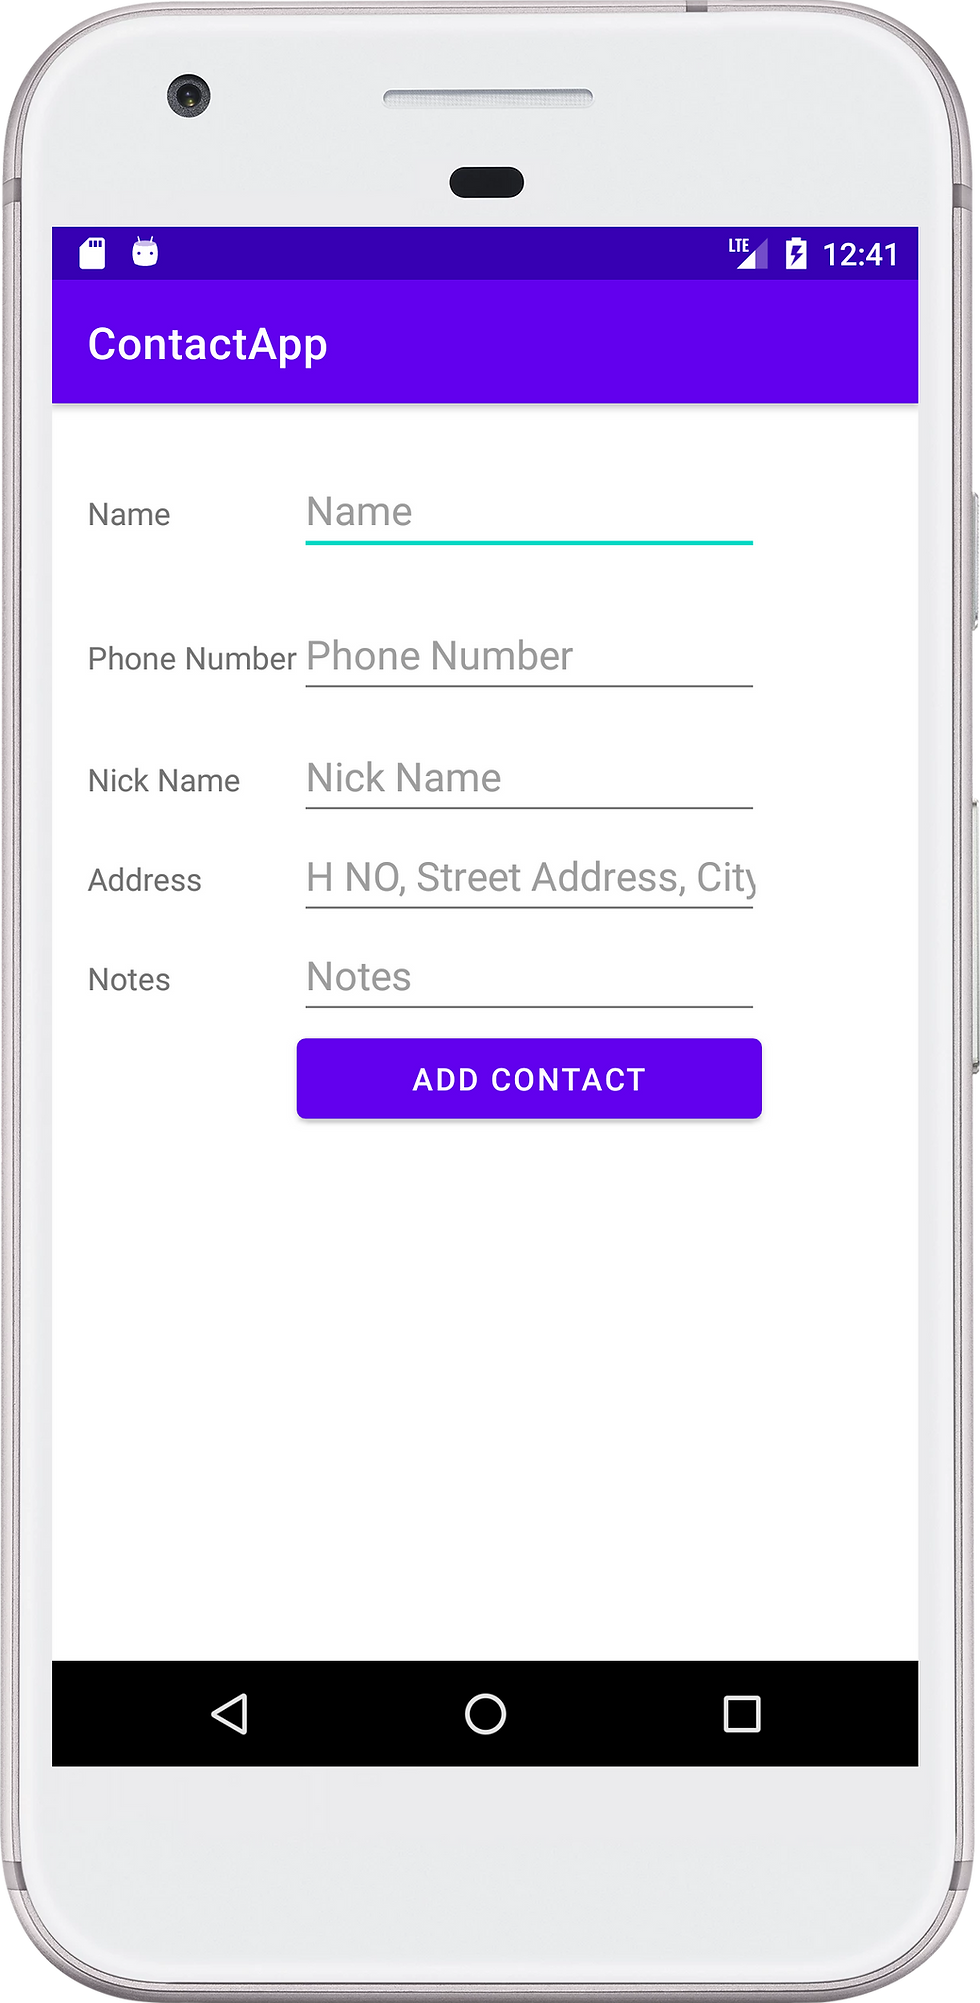
Create New Contact
create a new android project named ContactApp with an empty activity
now create a new activity named NewContact,
In order to create an activity just right click on res directory and in the new > activity option select Empty Acivity. After clicking on Empty Activity a popup appears which will asked the name and other details about the activity, fill the options and click finish button.
After that go the activity_new_contact.xml file and modify it as follows.
<?xml version="1.0" encoding="utf-8"?>
<RelativeLayout xmlns:android="http://schemas.android.com/apk/res/android"
    xmlns:app="http://schemas.android.com/apk/res-auto"
    xmlns:tools="http://schemas.android.com/tools"
    android:layout_width="match_parent"
    android:layout_height="wrap_content"
    android:padding="16dp"
    tools:context=".NewContact">


    <ScrollView
        android:layout_width="match_parent"
        android:layout_height="match_parent">

        <TableLayout
            android:layout_width="match_parent"
            android:layout_height="match_parent"
            android:layout_centerInParent="true"
            android:gravity="center"
            >

            <TableRow
                android:layout_width="match_parent"
                android:layout_height="match_parent"
                android:layout_marginTop="10dp"
                android:layout_marginBottom="10dp"
                >

                <TextView
                    android:id="@+id/textView"
                    android:layout_width="wrap_content"
                    android:layout_height="wrap_content"
                    android:layout_column="0"
                    android:text="Name" />

                <EditText
                    android:id="@+id/editTextName"
                    android:layout_width="wrap_content"
                    android:layout_height="wrap_content"
                    android:layout_column="1"
                    android:ems="10"
                    android:hint="Name"
                    android:inputType="textPersonName"
                    tools:ignore="TouchTargetSizeCheck" />
            </TableRow>

            <TableRow
                android:layout_width="match_parent"
                android:layout_height="match_parent"
                android:layout_marginTop="10dp"
                android:layout_marginBottom="10dp"
                >

                <TextView
                    android:id="@+id/textView2"
                    android:layout_width="wrap_content"
                    android:layout_height="wrap_content"
                    android:layout_column="0"
                    android:text="Phone Number" />

                <EditText
                    android:id="@+id/editTextPhone"
                    android:layout_width="wrap_content"
                    android:layout_height="wrap_content"
                    android:ems="10"
                    android:hint="Phone Number"
                    android:inputType="phone" />

            </TableRow>

            <TableRow
                android:layout_width="match_parent"
                android:layout_height="match_parent">

                <TextView
                    android:id="@+id/textView3"
                    android:layout_width="wrap_content"
                    android:layout_height="wrap_content"
                    android:layout_column="0"
                    android:text="Nick Name" />

                <EditText
                    android:id="@+id/editTextNickName"
                    android:layout_width="wrap_content"
                    android:layout_height="wrap_content"
                    android:layout_column="1"
                    android:ems="10"
                    android:hint="Nick Name"
                    android:inputType="textPersonName" />
            </TableRow>

            <TableRow
                android:layout_width="match_parent"
                android:layout_height="match_parent">

                <TextView
                    android:id="@+id/textView4"
                    android:layout_width="wrap_content"
                    android:layout_height="wrap_content"
                    android:layout_column="0"
                    android:text="Address" />

                <EditText
                    android:id="@+id/editTextTextPostalAddress"
                    android:layout_width="wrap_content"
                    android:layout_height="wrap_content"
                    android:layout_column="1"
                    android:ems="10"
                    android:hint="H NO, Street Address, City"
                    android:inputType="textPostalAddress" />
            </TableRow>

            <TableRow
                android:layout_width="match_parent"
                android:layout_height="match_parent">

                <TextView
                    android:id="@+id/textView5"
                    android:layout_width="wrap_content"
                    android:layout_height="wrap_content"
                    android:layout_column="0"
                    android:text="Notes" />

                <EditText
                    android:id="@+id/editTextTextMultiLine"
                    android:layout_width="wrap_content"
                    android:layout_height="wrap_content"
                    android:ems="10"
                    android:gravity="start|top"
                    android:inputType="textMultiLine"
                    android:hint="Notes"
                    />
            </TableRow>

            <TableRow
                android:layout_width="match_parent"
                android:layout_height="match_parent">

                <Button
                    android:id="@+id/button"
                    android:layout_width="wrap_content"
                    android:layout_height="wrap_content"
                    android:layout_column="1"
                    android:text="Add Contact"
                    android:onClick="addContact"
                    />
            </TableRow>
        </TableLayout>

    </ScrollView>


</RelativeLayout>
this will create a layout like this

Now create a new class named Contact and update the class code as follows
public class Contact {
    int id;
    private String name;
    private String number;
    private String nick_name;
    private String address;
    private String notes;

    public Contact(int id, String name, String number, String nick_name, String address, String notes) {
        this.id = id;
        this.name = name;
        this.number = number;
        this.nick_name = nick_name;
        this.address = address;
        this.notes = notes;
    }

    public int getId() {
        return id;
    }

    public void setId(int id) {
        this.id = id;
    }

    public String getName() {
        return name;
    }

    public void setName(String name) {
        this.name = name;
    }

    public String getNumber() {
        return number;
    }

    public void setNumber(String number) {
        this.number = number;
    }

    public String getNick_name() {
        return nick_name;
    }

    public void setNick_name(String nick_name) {
        this.nick_name = nick_name;
    }

    public String getAddress() {
        return address;
    }

    public void setAddress(String address) {
        this.address = address;
    }

    public String getNotes() {
        return notes;
    }

    public void setNotes(String notes) {
        this.notes = notes;
    }

    @Override
    public String toString() {
        return "Contact{" +
                "id=" + id +
                ", name='" + name + '\'' +
                ", number='" + number + '\'' +
                ", nick_name='" + nick_name + '\'' +
                ", address='" + address + '\'' +
                ", notes='" + notes + '\'' +
                '}';
    }
}
this is a model class with a parameterized constructor and getter setter methods.
Now create another class named DBController which will be use to connect to SQLite and will write all the queries into this class.
Update DBController class as follows:
public class DBController extends SQLiteOpenHelper {
    public DBController(@Nullable Context context) {
        super(context, "contact_app.db", null, 1);
    }

    @Override
    public void onCreate(SQLiteDatabase sqLiteDatabase) {
        String query;
        query = "CREATE TABLE contacts (id integer PRIMARY KEY,name TEXT,number TEXT,nick_name TEXT,address TEXT,notes TEXT)";
        sqLiteDatabase.execSQL(query);
    }

    public long addContact(Contact contact){
//        this method will add the contact to the database
        SQLiteDatabase db = this.getWritableDatabase();
        ContentValues values = new ContentValues();
//        here we adding the value with the column name as key along with the value
        values.put("name",contact.getName());
        values.put("number",contact.getNumber());
        values.put("nick_name",contact.getNick_name());
        values.put("address",contact.getAddress());
        values.put("notes",contact.getNotes());
//        insert method will insert the record and return the long value and -1 if not inserted or any error
        return db.insert("contacts",null,values);

    }

//    now we need a function to load all the record from the database
    public ArrayList<Contact> getAllContacts(){
        String query = "SELECT * FROM contacts";
        SQLiteDatabase db = this.getReadableDatabase();
        Cursor cursor = db.rawQuery(query,null);
        ArrayList<Contact> contactArrayList = new ArrayList<>();
        if(cursor.moveToFirst()){
            do {
                Contact contact = new Contact(cursor.getShort(0), cursor.getString(1), cursor.getString(2),cursor.getString(3),cursor.getString(4),cursor.getString(5));
                contactArrayList.add(contact);
            }while (cursor.moveToNext());
        }
        return contactArrayList;
    }

//    in this method we providing contact id and get the contact info
    public Contact getContactInfo(int id){
        Contact contact = null;
        String query = "SELECT * FROM contacts WHERE id = '"+id+"'";
        SQLiteDatabase db = this.getWritableDatabase();
        Cursor cursor = db.rawQuery(query,null);
        if(cursor.moveToFirst()){
            contact = new Contact(cursor.getInt(0),cursor.getString(1),cursor.getString(2), cursor.getString(3),cursor.getString(4),cursor.getString(5));
        }
        return contact;
    }

//    this method will update the contact
    public int updateContact(Contact contact){
        SQLiteDatabase db = this.getWritableDatabase();
        ContentValues values = new ContentValues();
        values.put("name",contact.getName());
        values.put("number",contact.getNumber());
        values.put("nick_name",contact.getNick_name());
        values.put("address",contact.getAddress());
        values.put("notes",contact.getNotes());
        Log.d("TAG", "updateContact: "+values);
//        here we use the update method to update the contact - it will return 1 if updated successfully
        return db.update("contacts",values,"id = ?",new String[]{String.valueOf(contact.getId())});

    }

    public void deleteContact(int id){
        SQLiteDatabase db = this.getWritableDatabase();
        db.execSQL("DELETE FROM contacts where id = '"+id+"'");
    }

    @Override
    public void onUpgrade(SQLiteDatabase sqLiteDatabase, int i, int i1) {

    }
}
DBContoller class extends SQLiteOpenHelper and this class has one constructor in which we a defining the database contacts.db.
onCreate method is used to create a table so this method doing the same.
addContact method is used to add record to database
getAllContacts will fetch all the contacts.
getContactInfo will return a single contact by providing the id of contact.
updateContact will update the contact back to database.
deleteContact will delete the contact.
Now go to NewContact.java class and add the following code at the very top inside the class
public class NewContact extends AppCompatActivity {
//    create a object for DBCOntroller
    DBController controller = new DBController(this);

   ....
now define the addContact method to add the contact to the database.
    public void addContact(View view) {
//        getting the values from edittext
        int id = controller.getAllContacts().size()+1;
        String name = ((EditText) findViewById(R.id.editTextName)).getText().toString();
        String number = ((EditText) findViewById(R.id.editTextPhone)).getText().toString();
        String nick_name = ((EditText) findViewById(R.id.editTextNickName)).getText().toString();
        String address = ((EditText) findViewById(R.id.editTextTextPostalAddress)).getText().toString();
        String notes = ((EditText) findViewById(R.id.editTextTextMultiLine)).getText().toString();

//        make a contact object
        Contact contact = new Contact(id,name,number,nick_name,address,notes);
        long inserted = controller.addContact(contact);
        if(inserted!=-1){
            Toast.makeText(this, "Contact added successfully!", Toast.LENGTH_SHORT).show();
//            after add will go to contact list activity
            Intent intent = new Intent(this,ContactList.class);
            startActivity(intent);
        }else{
            Toast.makeText(this, "Something went wrong!", Toast.LENGTH_SHORT).show();
        }
    }
After contact created successfully the code will redirect user to new activity so let create that activity.
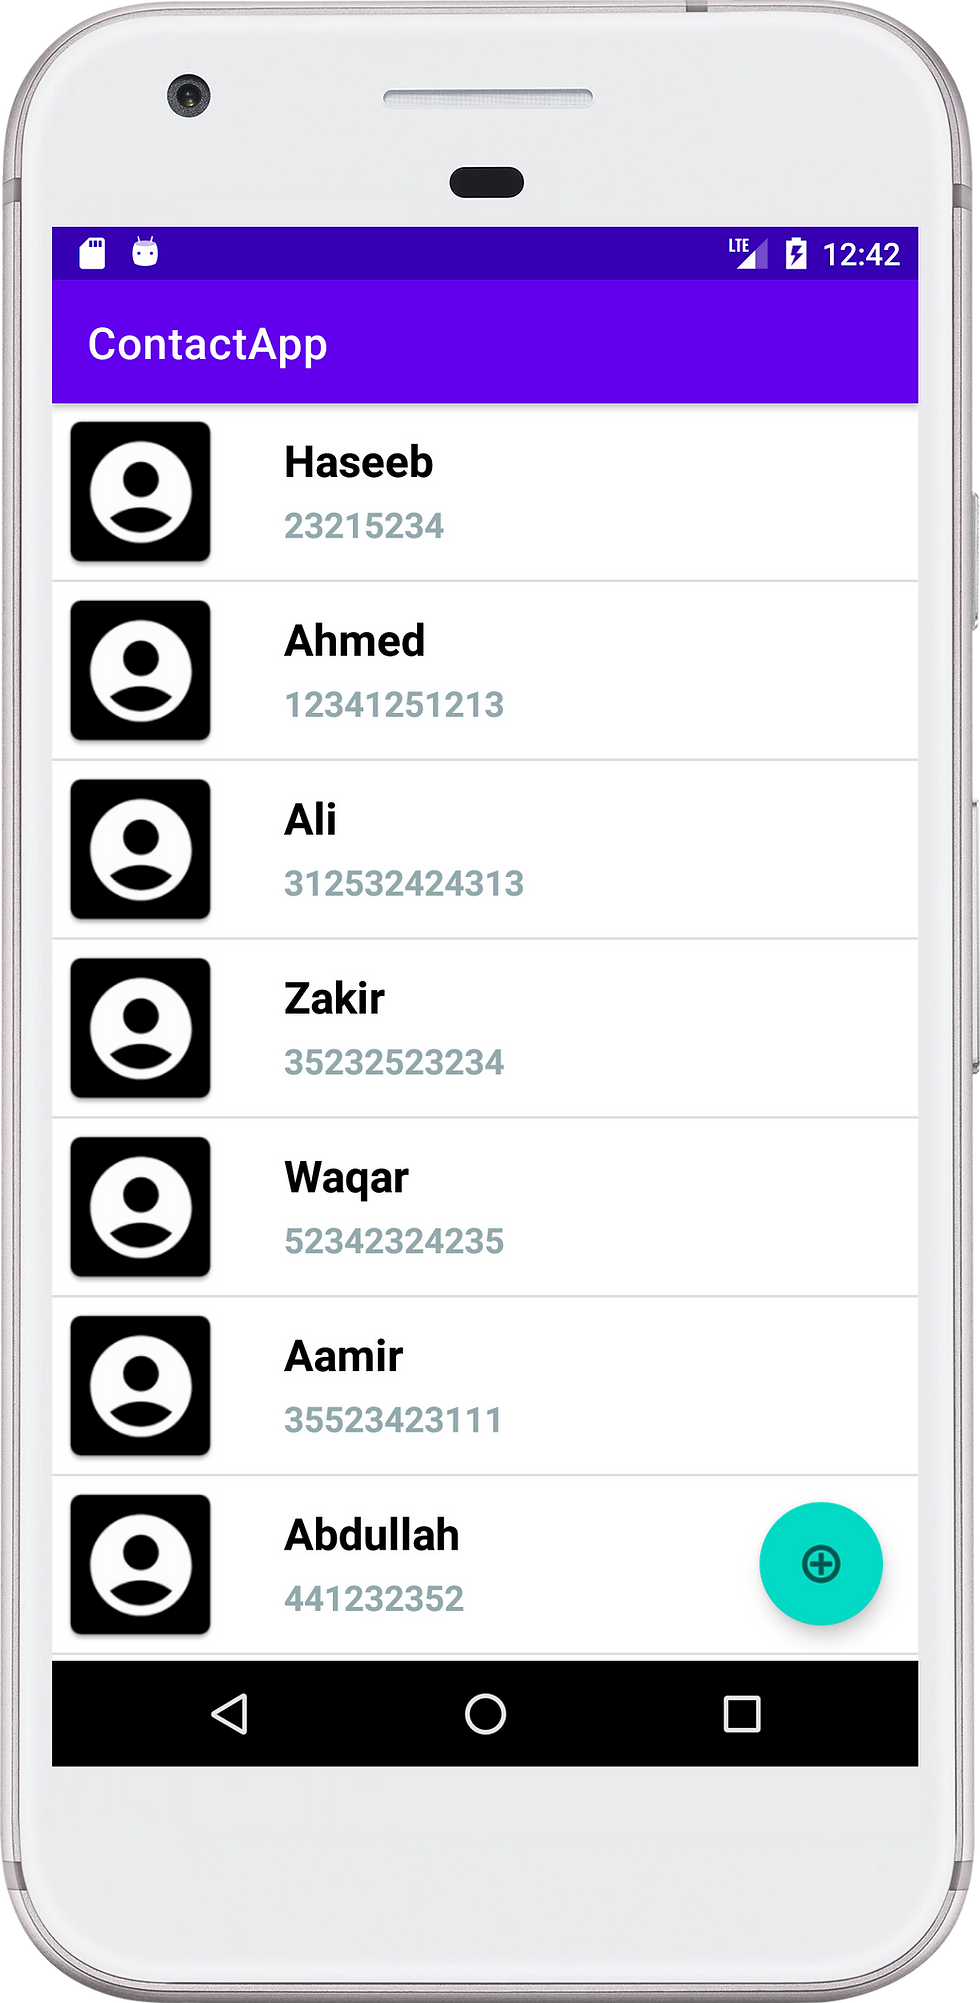
Contact List
Create a new empty activity named ContactList.
After creating it go to the activity_contact_list.xml file and update it as follow:
<?xml version="1.0" encoding="utf-8"?>
<RelativeLayout xmlns:android="http://schemas.android.com/apk/res/android"
    xmlns:app="http://schemas.android.com/apk/res-auto"
    xmlns:tools="http://schemas.android.com/tools"
    android:layout_width="match_parent"
    android:layout_height="match_parent"
    tools:context=".ContactList">


    <TextView
        android:id="@+id/tvMessage"
        android:layout_width="wrap_content"
        android:layout_height="wrap_content"
        android:layout_centerInParent="true"
        android:text="Click add button to add contact"
        android:textAlignment="center"
        android:textSize="20dp"
        />

    <ListView
        android:id="@+id/listView"
        android:layout_width="match_parent"
        android:layout_height="match_parent"
        android:layout_alignParentStart="true"
        android:layout_alignParentTop="true"
        android:choiceMode="singleChoice"
        />

    <com.google.android.material.floatingactionbutton.FloatingActionButton
        android:id="@+id/floatingActionButton"
        android:layout_width="wrap_content"
        android:layout_height="wrap_content"
        android:layout_alignParentRight="true"
        android:layout_alignParentBottom="true"
        android:layout_marginStart="16dp"
        android:layout_marginTop="16dp"
        android:layout_marginEnd="16dp"
        android:layout_marginBottom="16dp"
        android:clickable="true"
        android:onClick="goToNewContact"
        app:srcCompat="@android:drawable/ic_menu_add" />
</RelativeLayout>
Now go to ContactList.java file and add the following method
...
public void goToNewContact(View view) {
    Intent intent = new Intent(this,NewContact.class);
    startActivity(intent);
}
...
add this code inside the ContactList.java class before the onCreate method.
public class ContactList extends AppCompatActivity {
    DBController controller = new DBController(this);
    ArrayList<Contact> contactArrayList = new ArrayList<>();
    TextView textView;
    ListView listView;
    @Override
    protected void onCreate(Bundle savedInstanceState) {
    .....
update the onCreate method as follows:
//        here i wanted to load the list which is added
        contactArrayList = controller.getAllContacts();
        Log.i("TAG", "contacts :  "+contactArrayList.toString());
        textView = findViewById(R.id.tvMessage);
        listView = findViewById(R.id.listView);
        if(contactArrayList.size()>0){
            textView.setVisibility(View.GONE);
        }else{
            textView.setVisibility(View.VISIBLE);
        }
        ContactAdapter adapter = new ContactAdapter(this,contactArrayList);
        listView.setAdapter(adapter);
this code using an Adapter class to populate listView lets create that adapter.
create a new class named ContactAdapter and update the code inside the file as follows
public class ContactAdapter extends ArrayAdapter<Contact> {
    List<Contact> contactList;
    Context context;

    public ContactAdapter(@NonNull Context context, List<Contact> contactList) {
        super(context, 0,contactList);
        this.contactList = contactList;
        this.context = context;
    }

    @Override
    public void remove(@Nullable Contact object) {
        contactList.remove(object);
    }

    @NonNull
    @Override
    public View getView(int position, @Nullable View convertView, @NonNull ViewGroup parent) {
        View listItem = convertView;
        if(listItem == null){
            listItem = LayoutInflater.from(context).inflate(R.layout.item_view,parent,false);

            Contact contact = contactList.get(position);

            TextView name = listItem.findViewById(R.id.textViewName);
            name.setText(contact.getName());

            TextView number = listItem.findViewById(R.id.textViewNumber);
            number.setText(contact.getNumber());
        }

        return listItem;
    }
}
this adapter helps us to populate each contact to the listView for that we need to create a xml file that how each list item will be shown inside the listView
Lets create a new xml file named item_view.xml file and update the file code as follows:
<?xml version="1.0" encoding="utf-8"?>
<RelativeLayout xmlns:android="http://schemas.android.com/apk/res/android"
    xmlns:app="http://schemas.android.com/apk/res-auto"
    xmlns:tools="http://schemas.android.com/tools"
    android:layout_width="match_parent"
    android:layout_height="wrap_content"
    android:orientation="vertical">


    <ImageView
        android:id="@+id/imageView2"
        android:layout_width="80dp"
        android:layout_height="80dp"
        tools:srcCompat="@tools:sample/avatars"
        android:src="@mipmap/icon_user"
        />

    <LinearLayout
        android:layout_width="wrap_content"
        android:layout_height="wrap_content"
        android:orientation="vertical"
        android:layout_toRightOf="@id/imageView2"
        android:layout_marginLeft="20dp"
        android:layout_centerVertical="true"
        >
        <TextView
            android:id="@+id/textViewName"
            android:layout_width="wrap_content"
            android:layout_height="wrap_content"
            android:layout_marginLeft="5dp"
            android:layout_marginRight="5dp"
            android:layout_marginBottom="3dp"
            android:layout_weight="1"
            android:text="TextView"
            android:textColor="@color/black"
            android:textSize="20sp"
            android:textStyle="bold" />

        <TextView
            android:id="@+id/textViewNumber"
            android:layout_width="wrap_content"
            android:layout_height="wrap_content"
            android:layout_marginLeft="5dp"
            android:layout_marginTop="2dp"
            android:layout_marginRight="5dp"
            android:layout_marginBottom="2dp"
            android:text="Number"
            android:textSize="16sp"
            android:textStyle="bold"
            android:textColor="#94abae"
            />
    </LinearLayout>

</RelativeLayout>
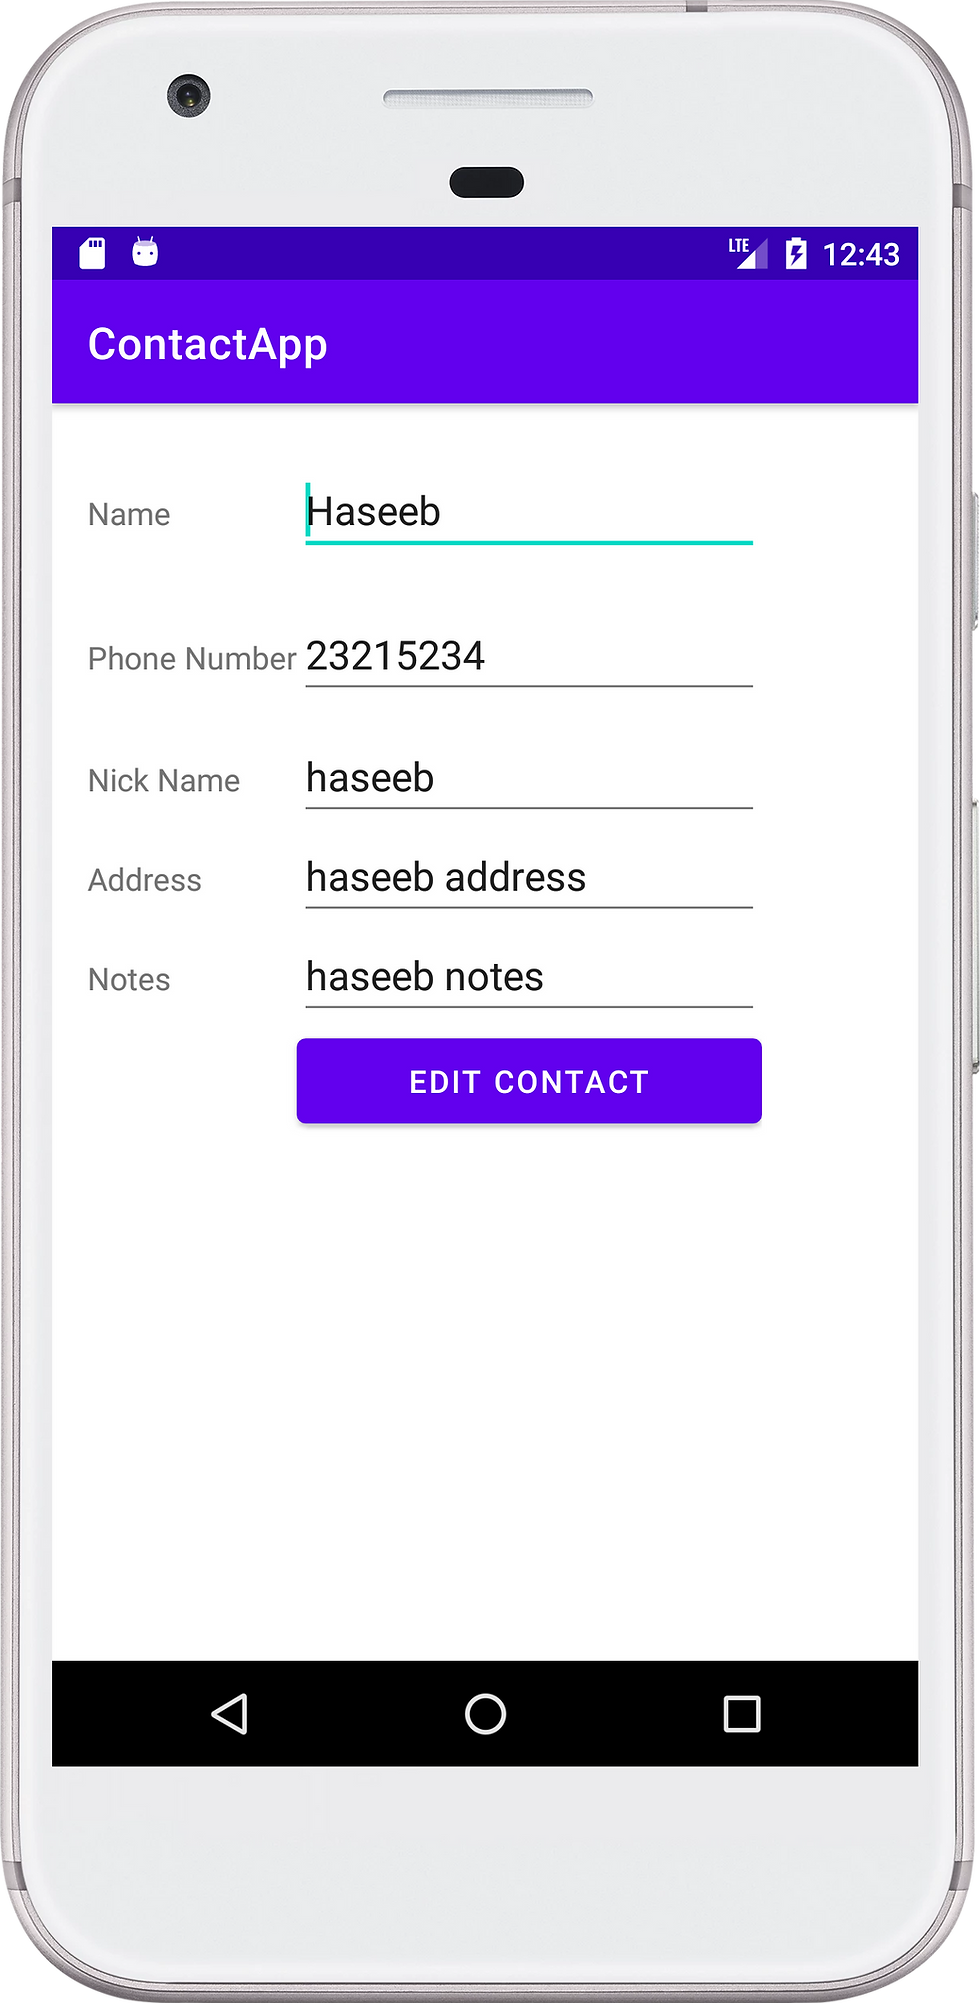
Edit Contact
For edit the contact we need to add setOnItemClickListener to listView as follows:
listView.setOnItemClickListener(new AdapterView.OnItemClickListener() {
            @Override
            public void onItemClick(AdapterView<?> parent, View view, int position, long id) {
            ......
 });
create a new activity named EditContact
inside the EditContact.java file add the initContactDetails method as follows:
	    private void initContactDetails() {
//        here we are getting the references of editText input view
        EditText name = findViewById(R.id.editTextName);
        EditText number = findViewById(R.id.editTextPhone);
        EditText nickName = findViewById(R.id.editTextNickName);
        EditText address = findViewById(R.id.editTextTextPostalAddress);
        EditText notes = findViewById(R.id.editTextTextMultiLine);
//        here we are getting the information by passing the id in parameter
        contact = controller.getContactInfo(id);
//        setting the information to the editText
        name.setText(contact.getName());
        number.setText(contact.getNumber());
        nickName.setText(contact.getNick_name());
        address.setText(contact.getAddress());
        notes.setText(contact.getNotes());
//        making the save button visible
        Button saveButton = findViewById(R.id.btn_save);
    }
do some initializations inside the EditContact class as follows:
public class EditContact extends AppCompatActivity {
    DBController controller = new DBController(this);
    int id;
    Contact contact;
    ...
now class the defined method inside the onCreate method and initialize the id.
....
//        here we get the id from intent extra
        id = getIntent().getIntExtra("id",0);
        initContactDetails();
 ....
now go to activity_edit_contact.xml file and update code as below:
<?xml version="1.0" encoding="utf-8"?>
<RelativeLayout xmlns:android="http://schemas.android.com/apk/res/android"
    xmlns:app="http://schemas.android.com/apk/res-auto"
    xmlns:tools="http://schemas.android.com/tools"
    android:layout_width="match_parent"
    android:layout_height="wrap_content"
    android:padding="16dp"
    tools:context=".EditContact">


    <ScrollView
        android:layout_width="wrap_content"
        android:layout_height="wrap_content">
        <TableLayout
            android:layout_width="match_parent"
            android:layout_height="match_parent"
            android:layout_centerInParent="true"
            android:gravity="center"
            >

            <TableRow
                android:layout_width="match_parent"
                android:layout_height="match_parent"
                android:layout_marginTop="10dp"
                android:layout_marginBottom="10dp"
                >

                <TextView
                    android:id="@+id/textView"
                    android:layout_width="wrap_content"
                    android:layout_height="wrap_content"
                    android:layout_column="0"
                    android:text="Name" />

                <EditText
                    android:id="@+id/editTextName"
                    android:layout_width="wrap_content"
                    android:layout_height="wrap_content"
                    android:layout_column="1"
                    android:ems="10"
                    android:hint="Name"
                    android:inputType="textPersonName"
                    tools:ignore="TouchTargetSizeCheck" />
            </TableRow>

            <TableRow
                android:layout_width="match_parent"
                android:layout_height="match_parent"
                android:layout_marginTop="10dp"
                android:layout_marginBottom="10dp"
                >

                <TextView
                    android:id="@+id/textView2"
                    android:layout_width="wrap_content"
                    android:layout_height="wrap_content"
                    android:layout_column="0"
                    android:text="Phone Number" />

                <EditText
                    android:id="@+id/editTextPhone"
                    android:layout_width="wrap_content"
                    android:layout_height="wrap_content"
                    android:ems="10"
                    android:hint="Phone Number"
                    android:inputType="phone" />

            </TableRow>

            <TableRow
                android:layout_width="match_parent"
                android:layout_height="match_parent">

                <TextView
                    android:id="@+id/textView3"
                    android:layout_width="wrap_content"
                    android:layout_height="wrap_content"
                    android:layout_column="0"
                    android:text="Nick Name" />

                <EditText
                    android:id="@+id/editTextNickName"
                    android:layout_width="wrap_content"
                    android:layout_height="wrap_content"
                    android:layout_column="1"
                    android:ems="10"
                    android:hint="Nick Name"
                    android:inputType="textPersonName" />
            </TableRow>

            <TableRow
                android:layout_width="match_parent"
                android:layout_height="match_parent">

                <TextView
                    android:id="@+id/textView4"
                    android:layout_width="wrap_content"
                    android:layout_height="wrap_content"
                    android:layout_column="0"
                    android:text="Address" />

                <EditText
                    android:id="@+id/editTextTextPostalAddress"
                    android:layout_width="wrap_content"
                    android:layout_height="wrap_content"
                    android:layout_column="1"
                    android:ems="10"
                    android:hint="H NO, Street Address, City"
                    android:inputType="textPostalAddress" />
            </TableRow>

            <TableRow
                android:layout_width="match_parent"
                android:layout_height="match_parent">

                <TextView
                    android:id="@+id/textView5"
                    android:layout_width="wrap_content"
                    android:layout_height="wrap_content"
                    android:layout_column="0"
                    android:text="Notes" />

                <EditText
                    android:id="@+id/editTextTextMultiLine"
                    android:layout_width="wrap_content"
                    android:layout_height="wrap_content"
                    android:ems="10"
                    android:gravity="start|top"
                    android:inputType="textMultiLine"
                    android:hint="Notes"
                    />
            </TableRow>

            <TableRow
                android:layout_width="match_parent"
                android:layout_height="match_parent">

                <Button
                    android:id="@+id/btn_save"
                    android:layout_width="wrap_content"
                    android:layout_height="50dp"
                    android:layout_column="1"
                    android:onClick="saveContact"
                    android:text="Edit Contact" />
            </TableRow>
        </TableLayout>
    </ScrollView>


</RelativeLayout>
if you check the button in the xml file it has a onClick attribute which will call the saveContact method so let define this method inside the EditContact class
public void saveContact(View view) {
//        this is the method where we will update the contact info again to the database
//        now we are getting the information from editText
        String name = ((EditText)findViewById(R.id.editTextName)).getText().toString();
        String number = ((EditText)findViewById(R.id.editTextPhone)).getText().toString();
        String nickName = ((EditText)findViewById(R.id.editTextNickName)).getText().toString();
        String address = ((EditText)findViewById(R.id.editTextTextPostalAddress)).getText().toString();
        String notes = ((EditText)findViewById(R.id.editTextTextMultiLine)).getText().toString();

//        here we create the contact Class object
        Contact contact = new Contact(id,name,number,nickName,address,notes);
//        now call the updateContact method from DbController class to update contact
        controller.updateContact(contact);
//        the method will return -1 if something went wrong
        if(controller.updateContact(contact)==-1){
            Toast.makeText(getApplicationContext(), "Something went wrong", Toast.LENGTH_LONG).show();

        }else{
//            else we will show the success toast and open the ContactList activity
            Toast.makeText(getApplicationContext(), "Contact Detail Saved", Toast.LENGTH_SHORT).show();
            Intent intent = new Intent(this,ContactList.class);
            startActivity(intent);
        }
}
this method will save the updated contact inside the database using the updateContact method of DBController class.
Delete Contact
For delete we will use setOnItemLongClickListener of listView so add the following code inside the onCreate method of ContactList class
//        let us add a functionality to delete the contact
listView.setOnItemLongClickListener(new AdapterView.OnItemLongClickListener() {
            @Override
            public boolean onItemLongClick(AdapterView<?> parent, View view, int position, long id) {
                new AlertDialog.Builder(ContactList.this)
                        .setTitle("Delete Contact")
                        .setMessage("Do you really want to delete this contact?")
                        .setIcon(android.R.drawable.ic_dialog_alert)
                        .setPositiveButton("Yes", new DialogInterface.OnClickListener() {
                            @Override
                            public void onClick(DialogInterface dialog, int which) {
                                Contact contact = (Contact) listView.getItemAtPosition(position);

//                                here we need to delete the contact from database also
                                controller.deleteContact(contact.getId());
                                contactArrayList.remove(contact);
//                                reinitialize the adapter
                                listView.setAdapter(new ContactAdapter(getApplicationContext(),contactArrayList));
                                Toast.makeText(ContactList.this, "Contact Deleted Successfully!", Toast.LENGTH_SHORT).show();
                            }
                        }).setNegativeButton("No",null).show();
                return true;
            }
        });
this code will show a alert dialog to confirm the deletion and delete the contact using the delectContact method on DBController class.
Hope this tutorial help you and increase your knowledge a little bit. If it do so tha don't forget the support me by subscribing my youtube channel and like the post.


Comments